Tag Archives: imposters syndrome

How to write from home

If you need to write from home or in a new or unfamiliar environment, you might find it challenging to stay focused. This guide suggests ways to help you maintain focus and improve your productivity when writing at home. In this guide I refer to ‘writing sessions’. These are activities planned in advance, last for a certain period of time and during which you only write, rewrite or edit. 

1. Create a Zone of Silence

The principles of creating a Zone of Silence at home are similar to creating a zone of silence in your workplace. The rules of the Zone of Silence are that you:

  • Work in an area that is devoted to writing.
  • Only work on one project at a time.
  • Only have access to the writing and reading materials needed for your current project.
  • Turn off your access to the internet and telephone.
  • Limit any unnecessary interruptions and distractions.

Although these conditions may be hard to meet at home, the following suggestions may also help you follow these rules:

  • Complete all internet-based research before you start your writing sessions.
  • Wear headphones and listen to background or instrumental music while writing.
  • Choose times to write when your house or apartment is empty or quiet.
  • If you normally write with a desktop computer, occasionally try switching to writing with a laptop; you may then find it easier to confine yourself to smaller writing-devoted areas.

2. Turn writing into a habit

When you regularly repeat a task, it takes gradually takes less motivation to start and complete this task.

Try setting up a writing routine by planning regular writing sessions, either daily or every second day. However, don’t be too optimistic when setting time limits for your writing sessions. It can be difficult to turn writing into a habit if you think you need to set aside large blocks of time before you can write (e.g. a full day or 2-3 days in a row), so establish a writing routine by starting small. Shorter tasks are easier to complete and are less likely to be put off.

First allocate short writing sessions, e.g. 15-minute duration. As you develop your routine, gradually increase your time limit to 60-minutes per writing session. Allocate longer sessions if appropriate or if working to a deadline.

Don’t be too harsh on yourself if you skip some days while developing your routine. Don't let the fact that you’ve skipped a few days be an excuse for avoiding further attempts to establish a routine.

3. Get started by reviewing your previous draft

Getting started is a common problem no matter where you write. One suggestion is to routinely begin each writing session by first reviewing what you wrote during your last writing session. Refreshing your thinking about what you were working on previously may make it easier to start writing. But first print out your previous draft instead of just viewing it on screen, then edit it with a pen. Periodically printing out your document makes it easy to view your draft in its entirety which is difficult to do via a computer screen. When you finish each writing session, print out your final version, so you have physical evidence of your writing progress and are ready for your next session.

4. Find a writing buddy

A writing buddy is someone you might work or study with who also needs to write regularly. A writing buddy is someone who reads your writing and gives you feedback and in return you read their writing and give them feedback. You can email documents to each other and critique each other's work for clarity or complete general editing or proofreading.

You might find that committing to swap editing and feedback will help you be more productive and to create regular writing routines. You might also want to schedule regular catch-ups to discuss your work, either face-to-face or through online meeting platforms.

Remember…

Avoid creating unrealistic expectations on how much writing you can do in an unfamiliar environment. It is unrealistic to expect that we can be super-productive writing machines that can write anything, anywhere and at any time. Aim to write in intensive pre-organised, short blocks of time in an environment that is as comfortable and distraction-free as possible.

Find out more about our new online course...


SUBSCRIBE to the Writing Clear Science Newsletter

to keep informed about our latest blogs, webinars and writing courses.

Handwriting notes and to-do lists is still a good idea

Writing to-do lists on paper might seem a waste of time if you already prepare to-do lists with software. Project management software such as Asana and Trello are effective and powerful tools and I am not suggesting we stop using them and go back to paper. My concern is that relying on software might cause a lack of spontaneity when doing research and in capturing ideas when working on other tasks. Well-designed paper lists and organised note-taking can still play an important role in project management and be used in conjunction with software. 

There are important benefits to hand-written note-taking that we might overlook if we decide to only write electronically:

1.  It’s quick and easy to jot down short tasks and simple ideas on paper

When we are in the middle of a task and come up with a good idea or something we need to remember, it may be easier and less distracting to just jot these thoughts down on paper. Having to open up software, allocate an idea or task to a project description, describe the task, decide who is responsible for a task and when it should be completed is time-consuming.

2. Not everything we write needs to be kept

 Not everything we write down will be worthy of further consideration. Occasionally, ideas or tasks will become inconsequential or lose attraction if they are left for a period of time. If paper lists are reviewed every 1-2 days, items or ideas that are no longer relevant can simply be crossed off or ignored. While improved technology may allow us to collect more information, it can contribute to information overload. Using electronic tools to capture everything we have to do or every idea we come up with might mean we end up with huge lists of items that will all need to be reviewed at some point.


3. A paper list is easy to refer to and doesn’t need batteries

Using paper lists to record tasks and ideas is easy to refer to. Even with multiple computer screens it is difficult to keep more than 2 or 3 pages of anything open at the same time. You can also take a quick snap of your paper list with your smartphone if you need a quick backup or want to share it.

4. Handwriting can force you to summarise effectively

Note-taking helps to focus attention on more important items and reviewing notes is also beneficial for recall (Kiewra 1985, Kiewra et al. 1991). While note-taking by typing or vocal recording is effective and easy with software, what you record still requires effective classification for easy retrieval. If you tend to take too many notes indiscriminately, it may be difficult to later decide what is important. As the act of handwriting is usually slower than typing, we are forced to highlight what is most important. Therefore, compiling paper lists may help you to summarise important information quickly. Ideas and tasks that remain after reviewing paper lists can then be transferred to software.

What are the features of a well-designed to-do list?

Ultimately what works best for you will depend upon how you work and organise your time. I have developed the Daily Task & Ideas Workbook and offer it here free of charge (and no email signup). This workbook is designed to be printed out and used to capture ideas and tasks on paper, while simultaneously allocating the priority and stage of completion of different tasks. This workbook can also be used to help you identifying new tasks and projects. The workbook has two pages (Page 1 - Daily Task List and Page 2 - Ideas & Brain Dump) with the following sections:

Page 1 – Daily Task List.

ROCKS (Must do today); PEBBLES (Must do soon); SAND (Short, discrete tasks)

The three sections in the first column are used to record tasks of different priorities. I use the ROCKS/PEBBLES/SAND analogy where the difference in sizes between ROCKS, PEBBLES and SAND mostly relates to the priority of the task. The general idea is that you can only fit in a certain number of large ROCKS in a container but the container is not yet full as you can still fit in smaller PEBBLES. After you have placed in all the pebbles that will fit into the container, you can still pour in SAND.  I have adapted this idea so that ROCKS are the tasks that must be completed today, PEBBLES are tasks that must be completed soon while SAND tasks are the short, important tasks that can be completed in between other tasks or when you lack energy or time to complete larger tasks.  When your list is reviewed, invariably, PEBBLES and SAND will become ROCKS if they are left incomplete and grow increasingly important.

The three sections in the second column are used to record tasks that are COMPLETED; STARTED/ONGOING; and OVERDUE/SCRUB TICKS.  Personally, I like to highlight tasks that have been COMPLETED during the day as this gives me a visual reminder of what I have achieved and helps me to feel productive.

Page 2 – Ideas & Brain Dump

This page is designed to capture brand new ideas and to identify new projects, sub-projects and tasks. It also includes a section to record topics that need research and projects that need updating.

My recommendation is to use the Daily Task & Ideas Workbook it for 1-2 days then review the content. Items that haven’t been crossed out or completed can be either moved to a fresh workbook or to project management software. The Daily Task & Ideas Workbook can be downloaded here: version 1 or version 2. You can also download an example workbook that includes hypothetical tasks and ideas. 

REFERENCES 

Kiewra, K. A. (1985). Investigating notetaking and review. A depth of processing alternative. Educational Psychologist, 20, 23-32

Kiewra, K., Mayer, R., Christensen, M., Kim, S., & Risch, N. (1991). Effects of repetition on recall and note-taking: Strategies for learning from lectures. Journal of Educational Psychology., 83(1), 120-123.

© Dr Marina Hurley 2021 www.writingclearscience.com.au

Find out more about our new online course...


SUBSCRIBE to the Writing Clear Science Newsletter

to keep informed about our latest blogs, webinars and writing courses.

How to build and maintain confidence as a writer

Why is it crucial to develop confidence?

If writing is central to your profession, it is crucial to build and maintain confidence in yourself as a writer. Being confident about your writing is being able to:

  • rely on yourself to regularly produce high-quality material
  • concentrate on creating and developing new ideas and solutions to new and existing problems, instead of worrying about whether your writing is good enough
  • consider writing as a tool rather than a chore
  • find writing enjoyable and rewarding

If you are committed to improving your writing, then your self-confidence will build as your writing improves. No matter how you feel about your current level of skill, commit to continual self-improvement and aim to feel satisfied with what you have achieved so far. This is what I do.

Realise that writing consists of separate tasks

Rather than considering writing as one discrete task, identify the different activities associated with writing and review how proficient you are at each one. Then work on improving each task separately. For example:

  • Getting started
  • Conceiving and developing ideas
  • Word choice: Choosing the right words to say what you mean
  • Phrase construction: Choosing the right group of words to say what you mean
  • Clause and sentence construction: Expressing ideas concisely, logically and coherently
  • Paragraph construction: Linking ideas in a logical order and developing a stand-alone story
  • Developing an argument: Identifying different viewpoints and effectively stating your case
  • Forming unique conclusions: Outlining your contribution to your discipline

Be kind to yourself

It is important to critique your writing and identify what can be improved, but avoid harshly criticising yourself.

(Everyone knows this but…) Be realistic about the time it takes to write

The time needed to complete a document is always underestimated. You need to allocate sufficient time to write regularly. Be realistic when working out how much time is needed to write. Make sure you plan your writing before you start. Avoid work procrastination.

Never compare yourself to others

Only compare your current level of skill to your past level of skill. Regularly look back at your past work and identify how your skills have improved. Observe how far your skills has progressed and allow yourself to feel satisfied with any improvement, no matter how small. Identify areas that need further improvement and allow yourself to gain confidence from your ability to identify what needs improving. An important part of skill development is getting better at recognising what needs improvement.

There are many ways to improve your writing

Identify the ways you can learn to improve your writing; for example, resources, books, blogs, writing workshops, online courses or one-on-one coaching assistance.

Get regular feedback

Always ask colleagues for feedback. Always. But make sure that you critique the feedback you receive, as not all of it may be useful or correct. Avoid taking any constructive criticism personally and avoid seeking feedback from those who regularly deliver overly-harsh criticism or tend to only give you praise.

Find a mentor or a colleague who can regularly give you constructive feedback. Join a writing group and share drafts with each other for peer-feedback and community support.

Blog

Set up a blog. Even if it is on a topic unrelated to science writing. Find a type of writing or topic that you really enjoy. Any type of writing will help improve your science writing skills, especially if you blog regularly.

Break through writer’s block

Use the tools that help break through writer’s block. Regularly having problems getting started may add to a lack of confidence. One quick and easy way of getting your thoughts down for a first draft is to record yourself speaking about your topic. Most smart phones and tablets have voice recognition software that can easily record or transcribe your speech.

Keep a portfolio (or library) of everything you complete

Keep a record of everything you produce. Create hard-copy portfolios of all your documents and include a table of contents with dates and titles. These portfolios can serve as a physical reminder of your productivity. Write one-page summaries of all completed projects in plain English with an eye-catching photo or diagram, and a good title. These one-page project summaries can be used to promote yourself and can also be prepared as a portfolio to show prospective employers.

Build confidence from your ability to learn

Remember that writing is like any other task with obstacles to overcome. Although it takes time for to become proficient at any skill, you can still be confident about your ability to learn.

Keep going

Keep writing, keep putting your work in front of an audience and keep getting feedback.

© Dr Marina Hurley 2018 www.writingclearscience.com.au

Find out more about our new online course...


SUBSCRIBE to the Writing Clear Science Newsletter

to keep informed about our latest blogs, webinars and writing courses.

Never label yourself a POOR writer

Both inexperienced and experienced writers attend my writing workshops and courses to learn how to improve their writing skills. Some display a distinct lack of confidence in their writing ability and describe themselves as poor writers with statements such as, “I am not a very good writer” or “Writing is something I have never been very good at”. Not only does this lack of confidence stem from a lack of experience, but is exacerbated by professional pressure to write well.

Being aware that your writing needs improvement is necessary if you want to improve, but a lack of confidence might indicate that you regularly have negative thoughts about writing. These negative thoughts may prevent effective learning.

How low self-confidence can reduce the quality of your writing

Writing for an audience is a type of performance, similar to getting onstage to sing or act or to give a talk at a conference. Performance anxiety is common for artists and performers and is based on the fear of appearing incompetent or simply 'not good enough'.

Similarly, many writers that lack confidence may suffer from a form of performance anxiety and worry about appearing incompetent or inexperienced. Writers who regularly suffer from low-self confidence could also suffer from “imposters syndrome” which is defined as, “…a false and sometimes crippling belief that one's successes are the product of luck or fraud rather than skill”.

If you suffer from low confidence, make sure it doesn't get in the way of your learning development. 

Examples of how low-confidence can adversely affect writers:

- Not applying for the ideal job. Having well-developed written communication skills is a key selection criteria for most science-based professions.

- Spending too much time editing and rewriting in an effort to be absolutely sure that each and every sentence is perfect. This habit of inefficient writing leaves less time for other tasks.

- Overusing the passive voice when presenting your conclusions or the implications of the findings of your study. While the overuse of active voice is also problematic (for other reasons), passive voice can obscure the identity of who is making certain conclusions and it may mask any unique contribution you’ve made to your work. For example, stating “It was thought that X+K = B” leaves the reader unsure whether, (a) it was the author that thought this, (b) it was another uncited author that thought this, or (c) that this statement was simply common knowledge.

- Not submitting a paper to a high-impact journal for fear of rejection or not re-submitting a paper to another journal if first rejected by the initial journal.

- Reducing the impact of your research by using overly cautious language when presenting your findings, even when you have strong supporting data.  For example, writing “This study’s findings may prove to be important when considering the impact of diet on gut microflora.” instead of “Our findings are important when considering the impact of diet on gut microflora”. Writers often overuse cautious language when they fear criticism.

- Reducing the impact of your research by using overly cautious or apologetic language when describing the limitations of your study. While it is wise to always mention any factors that limit how widely your findings can be interpreted, it is important not to appear apologetic or lacking in confidence. While it is important to mention factors that might reduce the robustness of your data, it is important to be confident when discussing the design and execution of your study. If you are not confident in the design and execution of your study, then get extra feedback from your supervisor or colleagues about whether to rewrite your limitations.

Avoid labelling yourself as a poor writer

Applying labels to summarise behaviour is problematic if you want the behaviour to change. Continuing to label your skill as being ‘poor’ or ‘bad’ may reinforce negative thoughts about your writing and may it difficult for you to improve and view yourself as a ‘good writer’. Similarly, allowing your colleagues to hear you describe yourself as a poor writer, may reinforce any negative views they may have about your writing skill.

Generally-speaking, self-confidence in your writing ability will build as your writing improves. Rather than worrying about your current skill level, commit to continual self-improvement and aim to feel satisfied with what you have achieved so far.

Some suggestions on how to approach your learning development:

  • Acknowledge the parts of your writing that are good and gain confidence from this.
  • Identify the parts that need improving and work at improving these skills.
  • Monitor how quickly you skills are improving, pay special attention to those areas where you continue to struggle then seek feedback on how to improve these skills.
  • Find a good mentor who can give you constructive feedback. Avoid seeking feedback from people who tend to harshly criticise your work.

In the next blogpost I discuss how to build and maintain your confidence as a writer.

© Dr Marina Hurley 2021 www.writingclearscience.com.au

Find out more about our new online course...


SUBSCRIBE to the Writing Clear Science Newsletter

to keep informed about our latest blogs, webinars and writing courses.

How to create figures from data

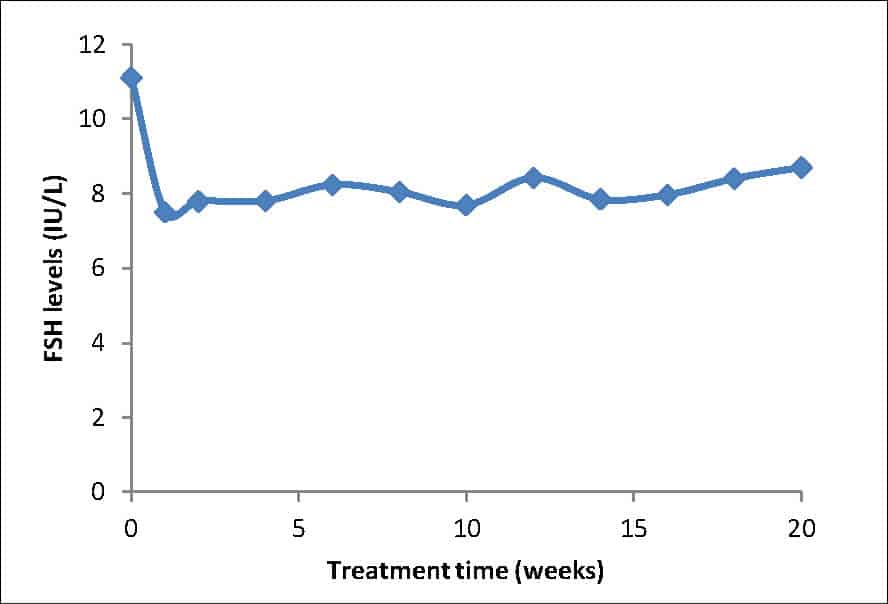
Figure 1: A line graph conveying a simple relationship between two variables. In this case, the variation of a measured hormone  over time.

 What is a figure?

Figures visually present information that cannot be clearly explained as written text or presented in a table. Figures can include graphs, flow charts, photographs, maps, illustrations, micrographs and diagrams. They can be simple; for example, a one-line graph that conveys a simple relationship between an x and y variable (see Figure 1), or they can contain multiple components, such as a graph, a diagram, a micrograph or photograph (see Figure 2). Figures have labelled components and a figure legend that clearly describes these components and summarises the key features.

 Planning your figure

As with tables, figures help the reader understand what you have found:  for example, key observations, statistically significant results, expected or unexpected trends in the data or any matter that needs further explanation. Figure design occurs after the data has been analysed and the main findings are apparent. The figures are usually presented in a results section and discussed in relation to  your research question or problem statement that was raised in your introduction. What figures you present also depends upon whether you are writing a report, journal article or thesis. A report can have a multitude of figures, while journal articles usually have strict page limits that force firm decisions on the number that can be included. Usually, there is more leeway for additional figures in a thesis.

Figure 2: An assembled figure contains multiple panels

When deciding how to place figures, prepare a mock layout to work out where each component will go, either by drawing boxes on  paper or by printing draft versions of what you expect the final version to look like. Will the figure take up one column or will it be a large multi-panelled figure that takes up two columns of a journal or one entire page of a thesis? (Figure 3)


 Preparing figures for journal publication

If you are preparing figures for journal publication, it is essential to first check the publisher’s requirements. Most journals have strict and detailed instructions with specific criteria: for example, image size, file type, resolution, colour space (e.g. RGB) and font types. If these criteria are not followed exactly, your publication may be returned by the editor for further changes.

Turning your raw data into a published figure: stay true to your data

Scientists are ethically bound to present their data truthfully and transparently. As a scientist, it is your responsibility to ensure that your figures accurately convey your original data and observations. In addition, universities and research centres must comply with the Australian Code for the Responsible Conduct of Research. As you manipulate your raw data into graphs and prepare your images for publication, your raw data is inevitably transformed in some way; even simple line graphs are a transformation of a set of experimental values. Photo-editing programs can also transform digital images by re-sampling (see fact sheet: Preparation of figures as digital images), which could result in an image that is different to the original.

Figure 3: Consider whether your figures are small enough to fit in one column to save space; larger figures may require two columns.

When preparing figures for publication in any form, it is important that you adhere to your organisation’s requirements for transparency and peer review. How you manipulated your raw data into the published figure  must be  transparent and repeatable. For example, does your final, published image look like the fluorescently-labelled image you saw down the microscope? Is the photo one actually taken of your study subject and not  another one similar to yours? Does your graph accurately explain the data, or have you left out some aspects of the data and inadvertently misrepresented your original findings? Make sure you save your files at each step of the transformation from raw data into a final published figure, and keep the files together in one folder.

What software do I use?

First, establish what software is freely available to you via your university or organisation.  Graphs and charts can be drawn in Excel and in a variety of statistical programs. CorelDraw or Adobe Photoshop and Illustrator are often recommended by publishers to draw diagrams, and to compile your images, graphs and diagrams into a publication-quality figure.

If looking to use free software, open-source software is often a good choice as it is completely free and is supported by an online community that engages in ongoing support and development. For example, freemind software for mind-mapping and Gimp for photo and image manipulation, and see Wikipedia for software listing for graphic software.

Microsoft Powerpoint is often readily accessible and can be useful for drawing or compiling diagrams. Set the page layout to A4 portrait and add all components, using alignment tools and rulers to align panels and text. However, Powerpoint only exports lower resolution files for monitors, rather than higher resolution required for printing. A way around this is to print the Powerpoint file to a pdf (using Adobe Acrobat Professional) and select High-Quality Print (300 dpi) in “Preferences”. The resulting pdf file can then be cropped and saved as a TIF file with a 300dpi resolution (use either Adobe Acrobat or Photoshop to crop and save as a TIF).

The essentials of a good figure

Once you have created the figure, check the following criteria:
- Does it look good when printed on paper? Can all the features of each different components be clearly seen?
- Are the labels clear and specific?
- Is the resolution of the final assembled figure appropriate?
- Does the legend title convey the key finding?
- Do the details in the legend adequately explain all of the components?
- Is the figure referred to at the appropriate places in the results section? Does the figure accurately convey what is written in the results?
- Ask a colleague to proofread and check the clarity of your figure. Can they understand the overall message? Do they understand what the different components are?

© Dr Liza O'Donnell & Dr Marina Hurley 

Any suggestions or comments please email admin@writingclearscience.com.au 

Find out more about our new online course...


SUBSCRIBE to the Writing Clear Science Newsletter

to keep informed about our latest blogs, webinars and writing courses.